21 Aug 2019
Storage Gateway is a hybrid service. It gives you on-premise access to cloud storage. Your application will connect to service through a VM or hardware appliance via common file access protocols such as NFS/SMB/iSCI. Gateway then connects to AWS to provide storage for files, volumes and tapes on S3, Glacier, EBS and AWS Backup. Gateway service includes highly optimized data transfer mechanism and has resilience built in for network issues. Data in cloud is cached on premises for low latency access. Transfers to cloud happen in background so applications can continue to function as if they’re working on premises while having data stored on cloud.
Gateway service provides three kinds of gateways, Tape Gateway, File Gateway, and Volume Gateway.
File Gateway (NFS & SMB)
File gateway mounts as NFS or SMB network share location and lets you store files there which are then backed up to AWS S3. All ownership, permission and timestamps information is saved as metadata in S3 objects.
Tape Gateway (VTL)
The Tape Gateway configuration is a cloud-based virtual tape library (VTL) that serves as a drop-in replacement for tape backup systems.
Volume Gateway (iSCSI)
With a Volume Gateway configuration, you can take snapshots of your local volumes and store those snapshots in Amazon EBS. Those snapshots can be the starting point for an Amazon EBS volume, which you can then attach to an Amazon EC2 instance. In the event of a local site disaster simply set up your applications in the cloud or in a different datacenter, and restore your snapshot to keep running. Volumes may be of type Stored or Cached.
Stored Volumes
Stored volume keeps your data local and asynchronously uploads your data to AWS S3 in form of Elastic Block Store.
Cached Volumes
Cached Volume stores latest accessed data from S3 on premises.
Additional Resources:
19 Aug 2019
CloudFront is CDN service offerred by Amazon. I will not go into detail of what CDN is, there should be a lot of resources on web describing what it is and reader should read them. In short, it’s one or more servers distributed accross the globe which cache content so users can reach data with least network hops. In terms of CloudFront, these servers are called Edge Locations. There are many more Edge locations than Regions or Zones.
CloudFront provides more functionality than a typical CDN. For example, being an Amazon product, it’s integrated well with other services such as S3, ELB, EC2. It can act as transfer accelerator for file uploads. So if somebody is in Australia and wants to upload a file for service hosted in Virginia, they can upload it to Sydney Edge location which will then route that request on optimal network path to Virginia at much faster speed. You can also use Lambda@Edge to run custom code closer to your users and customize user experience. It can also be used for DDoS mitigation with AWS Shield.
Cached content is available on edge location till TTL (Time to live) but can be cleared before TTL. There are charges for requesting removal of cached content before TTL.
Here are some terms that we should be faimilar with:
Origin
Origin is location where your primary content is available. This may be your S3 bucket, EC2 instance, Route 53, Elastic Load Balancer or third party hosted service. When a request is sent to edge location, it fetches content from origin then serves it. On later requests, request is directly served from cached content at edge location. You can also setup redundant origins so if one origin is not available, requests can fallback to another origin.
Distribution
Using AWS console or API calls, we can register S3 bucket as origin for static files and EC2 instance as origin for dynamic content. We can also define time to live (TTL) and other rules. Once done, we create a “distribution”. Distribution can consist of selected edge locations or all of Amazon’s available edge locations for caching. Distribution can be of two types. One serves standard website content like images or other static files. Other is RTMP, which serves video or audio streams. Once distribution is created, we get a URL such as “abc123.cloudfront.net”. This is called distribution domain name.
Additional Resources:
18 Aug 2019
AWS Snowmobile and Snowball are craziest AWS services that I know of. Sometimes it’s cheaper and faster for people to just carry your data from your premises to AWS data center. Amazon Snowball and Snowmobile address exactly that.
Snowball is a device which Amazon sends you by mail. It’s capable of storing petabytes of data. You attach this device to your data center, transfer all your data to device and mail it back to Amazon. Amazon attaches this device to their network and transfer it to S3 for you. This is much faster and cheaper than uploading Terabytes of data via internet. For example, uploading 100 TB of data will take more than 100 days to transfer on dedicated 100 MB connection. That same transfer can be accomplished with Snowmobile within a week. Bandwidth costs of large transfer can also easily expand to thousands of dollars. Snowmobile enables that transfer at 1/5th of the original cost. Refer to (Amazon Snowball)(https://aws.amazon.com/snowball/) page for more details.
AWS snowmobile is crazier than Snowball. It enables you to transfer 100 PB of data to Amazon S3. Amazon sends a truck with a container to your data center with people. They setup a switch and connect that between your data center and container. It is then driven back to Amazon where data is transferred to S3. It can optionally include security personnel, GPS tracking, alarm monitoring, 24/7 video surveillance and escort security vehicle in transit. See (Amazon Snowmobile)[https://aws.amazon.com/snowmobile/] page for details.
16 Aug 2019
S3 is probably second most frequently used AWS service after EC2. From what I have heard, It’s a big part of Solution Architect Exam, so I will to cover it in detail. S3 has a lot of features so I won’t be covering them all but will go through the important ones. For details S3 overview, A Cloud Guru has deep dive S3 course which you can refer to.
S3 comes from Simple Storage Service, that is, three S in name. It’s an object storage service. Objects are basically files and some metadata about these files. All objects get stored in Buckets. You can think of Buckets as folders in which you can organize and manage different files in S3. Bucket names need to be unique accross all of AWS, so you can’t create a bucket which was already created by someone else.
An S3 object has following content:
- Key (name of file)
- Value (data)
- Metadata (tags/labels and other data about data)
- Version ID (when we enable versioning of objects)
- Access Control Lists
- Torrent
S3 has read after write consistency for new objects. So if you put a new object in S3, you can immediately access it. For deletes and updates, it has eventual consistency so it may take a while to replicat update and delete to all Availability Zones and you may see a delay of few milliseconds or seconds before things get reflected everywhere.
Objects in S3 have 99.999999999% (11 9s) durability guarantee. So chances of having your stored objects lost are almost nil unless earth was hit by a meteor. Availability guarantee for S3 is 99.9%. That is, maximum amount of downtime for S3 is 8 hours 45 minutes 36 seconds yearly or 1 minute 26 seconds per day. Amazon claims they have designed S3 for 99.99% availability, that is 52 minutes 34 seconds yearly downtime or 9 seconds per day. While we are talking about SLAs, http://www.slatools.com/sla-uptime-calculator is good tool for calculating what SLAs percentiles mean in terms of time.
Some features of S3
S3 allows encryption, maintains compliance programs, such as PCI-DSS, HIPAA/HITECH, FedRAMP, EU Data Protection Directive, and FISMA, to help you meet regulatory requirements. It also has capability to log access to objects for audit purposes. You can replicate S3 objects accross regions for more availability. You can do S3 Batch operations to edit properties of billions of objects in bulk. S3 can also be used with Lambda so you can store stuff in S3 and serve them with Lambda Application without having to maintain additional infrastructure. You can also lock S3 objects and prevent their deletion. Multi Factor Authentication can also be used to prevent accidental deletion of S3 Objects. You may also query S3 objects using SQL via Amazon Athena. S3 Select can be used to retrieve subset of data in object rather than complete object and improve query performance.
Storage Tiers, Versioning and Lifecycles
Amazon S3 offers a range of storage classes designed for different use cases. These include S3 Standard for general-purpose storage of frequently accessed data; S3 Intelligent-Tiering for data with unknown or changing access patterns; S3 Standard-Infrequent Access (S3 Standard-IA) and S3 One Zone-Infrequent Access (S3 One Zone-IA) for long-lived, but less frequently accessed data; and Amazon S3 Glacier (S3 Glacier) and Amazon S3 Glacier Deep Archive (S3 Glacier Deep Archive) for long-term archive and digital preservation. So for example, if you acess data infrequently (S3-IA) or can tolerate delays of minutes to hours for data retrieval (S3 Glacier), you may store it in different tiers to save cost. It also allows us to setup lifecycles so we can setup rules such that if data is 3 months old, we may want to move it to infrequently accessed tier. If we have compliance data such as old access logs, we may want to store it in Glacier deep archive. You can read more about these tiers at Amazon S3 Storage Classes page. I am giving a brief explanation of these tiers below.
S3-Standard
S3 standard is ideal for frequently accessed and changed data. Here are some main features of it:
- Designed for 99.999999999 percentile durability and replicates data to at least 3 availability zones.
- Can survive complete Availability Zone failures. Designed for 99.99% Availability within a given year.
- Supports SSL in transit and Encryption at rest for data
- S3 Lifecycle management can be used to migrate data to other low cost tiers
S3-IA
S3-IA is for data which is infrequently accessed but requires immediate access when required. It’s cheaper than S3-Standard but you’re charged for data retrieval. It’s ideal for storing data of stale users, backups and storage of data for disaster recovery. Here are some features:
- Same throughput and latency as S3 Standard
- Lower cost for storage
- Can survive destruction of Availability Zone
- Designed for 99.9% Availability.
- Higher retrieval cost
S3-IA-One-Zone
Unlike S3-Standard and S3-IA which store data in multiple availability zones, S3-IA-One-Zone stores data in one zone. So in event of loss of that availability zone, data will be lost. It still redundantly stores data and is 99.999999999% resilient to loss within same zone. This class is ideal for secondary backups or easily re-creatable data. It can also be used as class for storage of data which is replicated using cross region replication. Here are some features which are different from S3 standard and S3-IA:
- Designed for 99.5% availability over a given year
- Same durability as S3 standard but within single zone
- Designed for 99.5% availability.
S3 Glacier
S3 Glacier is designed for data archival. Data stored in Glacier is not immediately accessible but there are three retrieval options which range from minutes to hours. Three options for retrieval are Expedited, Standard, or Bulk retrievals. Expedited retrievals are generally available within 1-5 minutes. Standard are available between 3-5 hours and Bulk retrievals are available between 5-12 hours. S3 Restore Upgrades allow us to upgrader retrieval time of a running in progress retrieval job. So for example, if you have a Bulk Reterieval job in progress but it has become more critical to retrive data, you can upgrade job to expedited. You will be charged for both jobs in that case.
Here are key features of Glacier:
- Low-cost design is ideal for long-term archive
- Configurable retrieval times, from minutes to hours
Refer to Amazon Glacier Page for details.
S3 Glacier Deep Archive
S3 Glacier Deep Archive is for long term retention data which is accessed once or twice a year. It costs 0.00099 per GB per month (Or $1 per TB of data). It’s the lowest cost storage option on AWS. Deep Archive is up to 75% cheaper than Standard Glacier class. You can use Standard retrieval to retrieve it within 12 hours You may also use Bulk Retrieval to further reduce retrieval cost. It’s designed for 99.9% availability. When you can afford long retrieval times for data, you may use deep archive. Deep archive is designed for data stored for long period of time so minimum storage time for objects stored in deep archive is 180 days. If you delete an object before 180 days, you’re charged for storage time and pro-rated charge for remaining days.
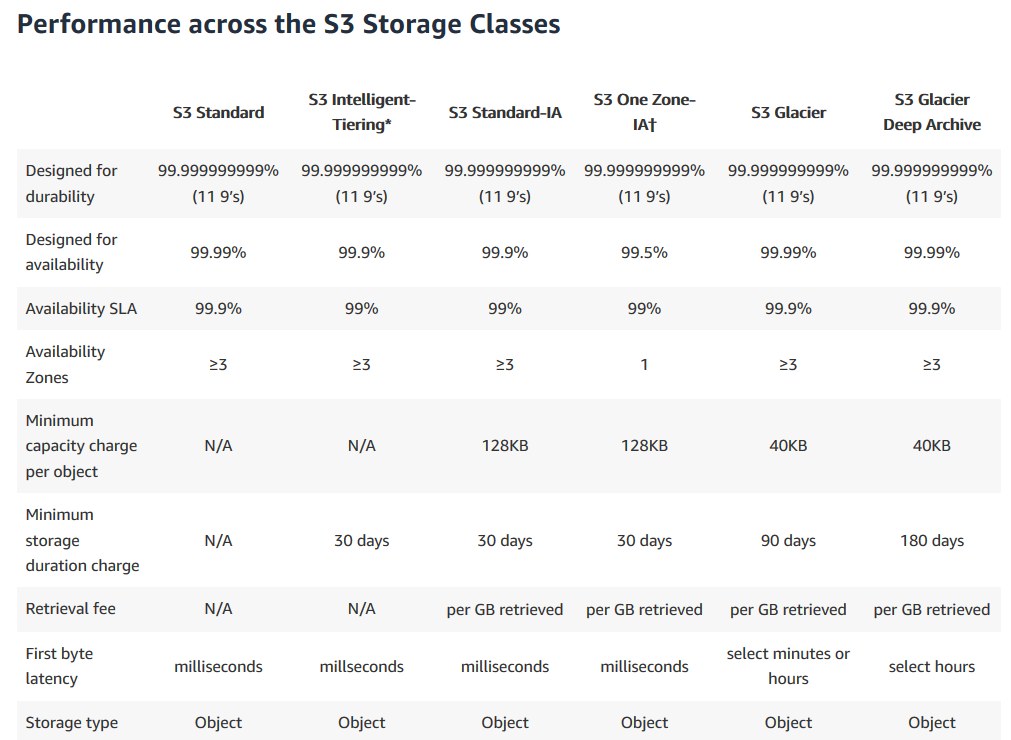
Storage Tiers Summary
Here’s table from S3 Tiers Page, explaining difference between different tiers:
Intelligent Tiering
S3 Intelligent tiering is meant for use with data which has unknown access patterns or changing patterns. It monitors your access patterns and automatically moves data to lower cost infrequent access tiers. If object is accessed later, it moves object back to frequently accessed tier.
Lifecycle Management
Lifecycle management provides ability to define lifecycle of object with preefined policy and reduce cost. You can define these policies to automatically move data from S3 to S3-IA, IA One Zone or Glacier archives. It can also be used to delete objects after a certain time. You can also setup policy to delete multi part uploads which expires incomplete multi part uploads after certain time.
Versioning
Versioning enables us to keep multiple versions of same object on update/delete requests. With versioning enabled, an update or delete would result in new version of object rather than overwriting existing version. Versioning is important for situations where you want to avoid accidently deleting or overwriting objects. Retrieval will always serve latest object but you may pass version in query parameters to get older versions. Each version of an object is charged for, so you can use lifecycle management to delete older versions. When you delete an object with versioning enabled, it only adds a delete marker as latest version of object. To truly delete all versions of object, you have to delete all versions. Delete operations are not replicated in Cross Region Replication to avoid accidental data loss. Versioning is irreversible operation, that is, once enabled, it can’t be disabled.
Transfer Acceleration
Amazon S3 Transfer acceleration enables us to improve upload speeds between clients and S3 buckets over a long distance. Transfter acceleration enables users in distant regions to upload their data to their nearest CloudFront Edge Location, which is then routed to bucket’s region via Amazon’s Backbone Network which is generally faster than uploading directly to that region.
According to S3 FAQs, “One customer measured a 50% reduction in their average time to ingest 300 MB files from a global user base spread across the US, Europe, and parts of Asia to a bucket in the Asia Pacific (Sydney) region. Another customer observed cases where performance improved in excess of 500% for users in South East Asia and Australia uploading 250 MB files (in parts of 50MB) to an S3 bucket in the US East (N. Virginia) region.”
You can use speed comparison tool to get preview of performance improvements if you enabled transfer acceleration.
Cross Region Replication
Cross region replication allows us to replicate data from one bucket to another accross regions.
Additonal Sources
15 Aug 2019
In this post I will document how to create a billing alert on AWS before we proceed to stuff that costs to use like using S3 or EC2.
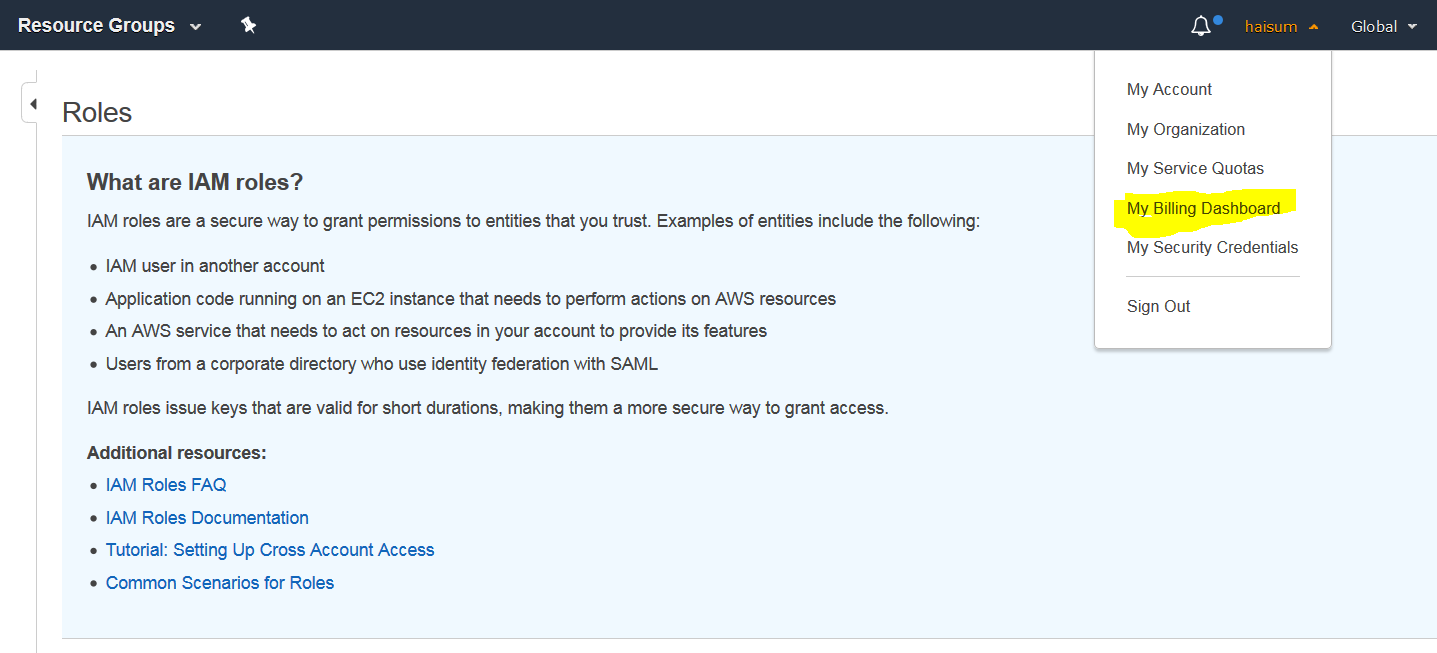
First go to your billing dashboard from top navigation.
Then click billing preference in left menu.
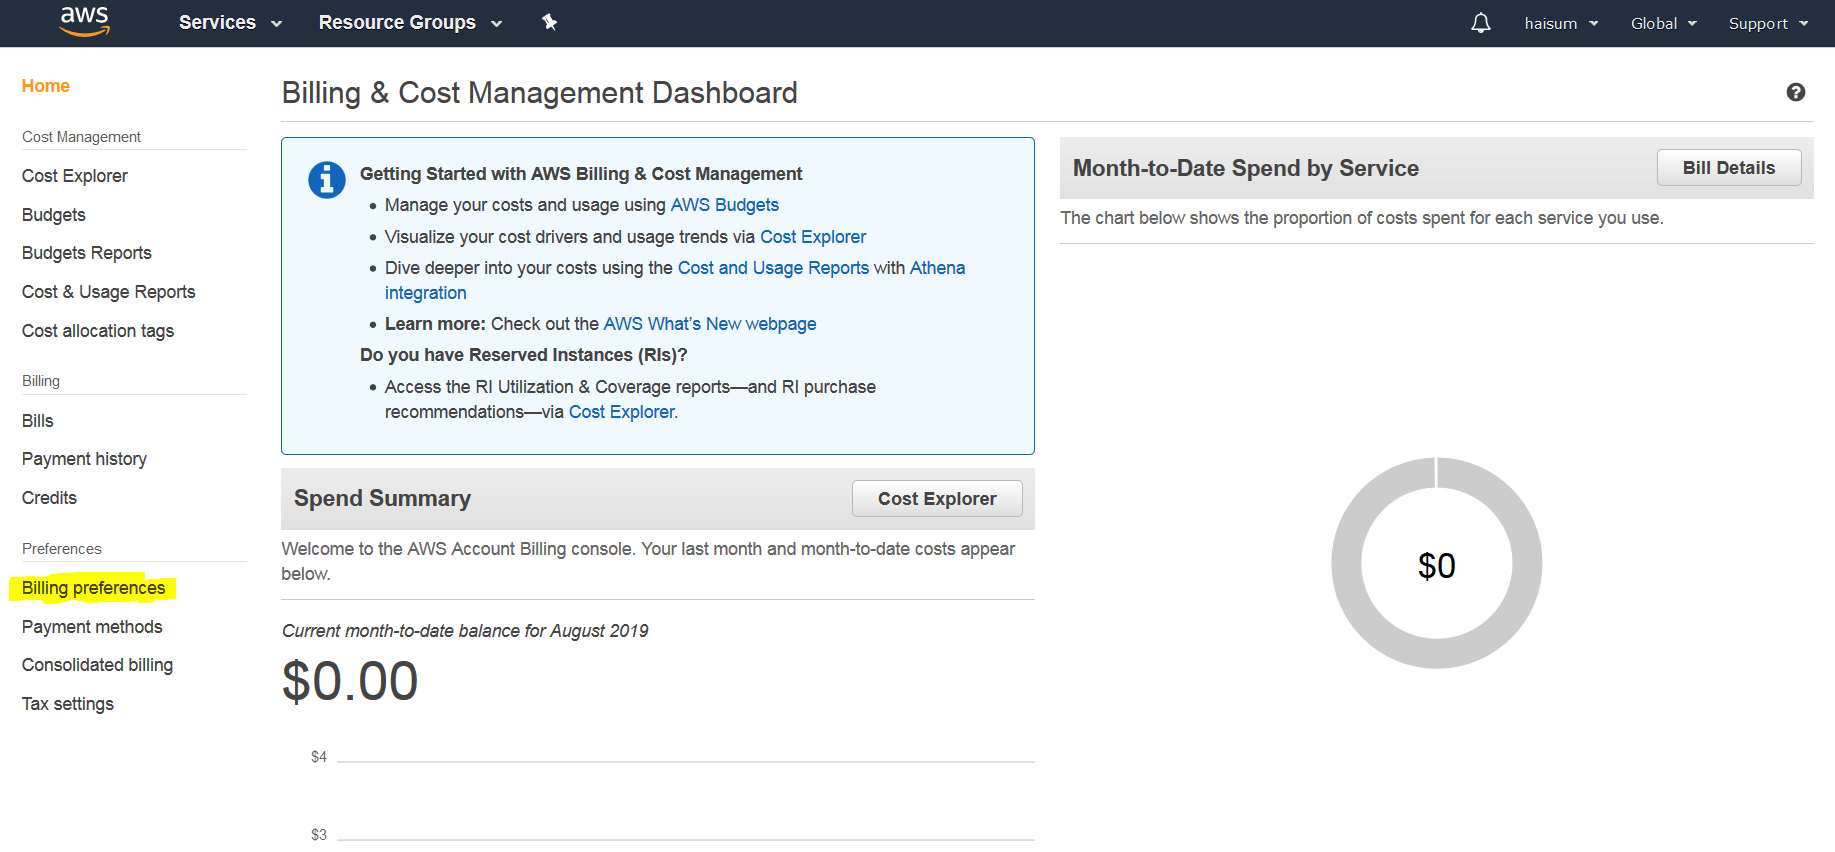
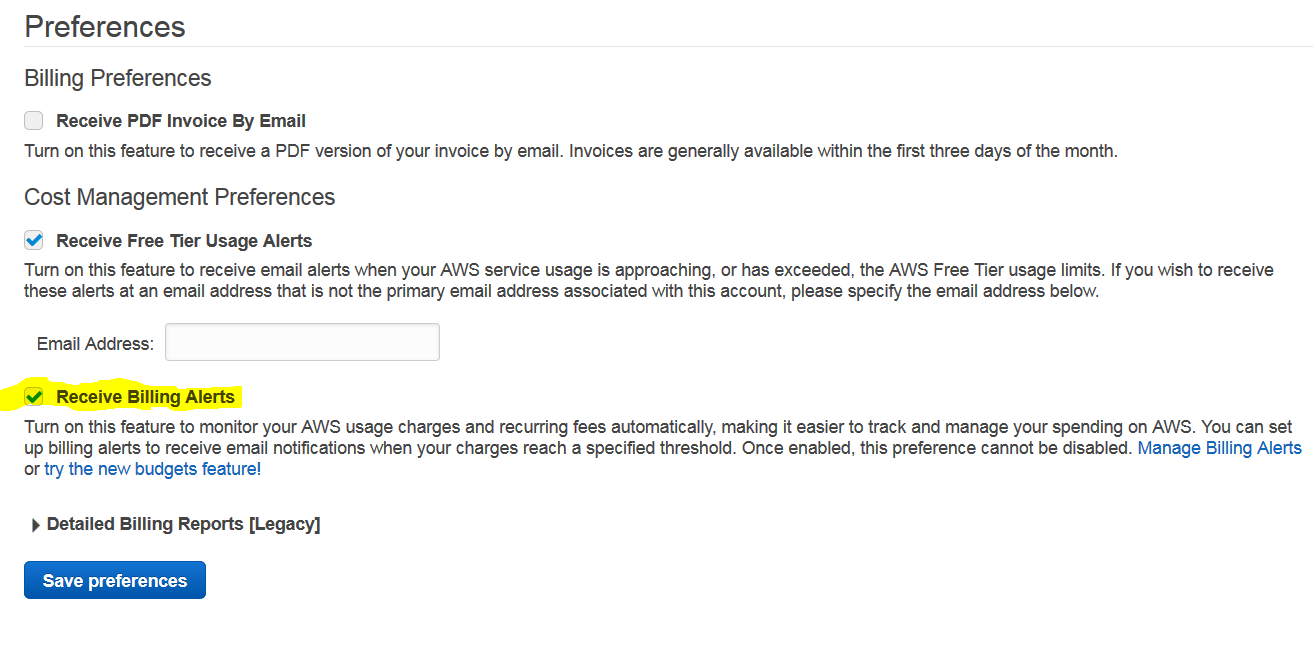
Now click Receive Billing Alerts then click Save Preferences.
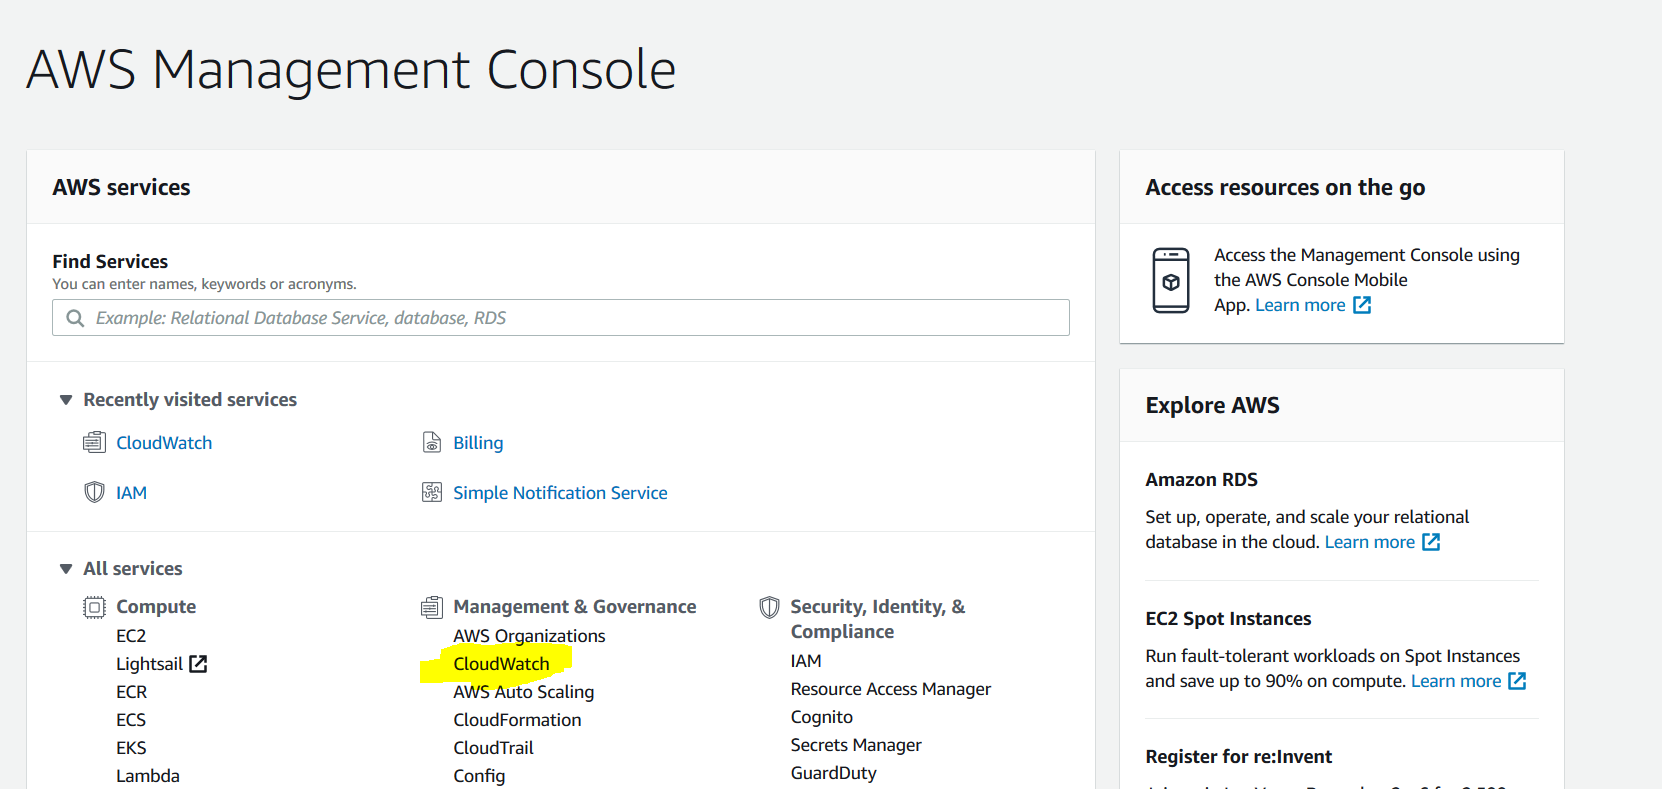
From services, select CloudWatch.
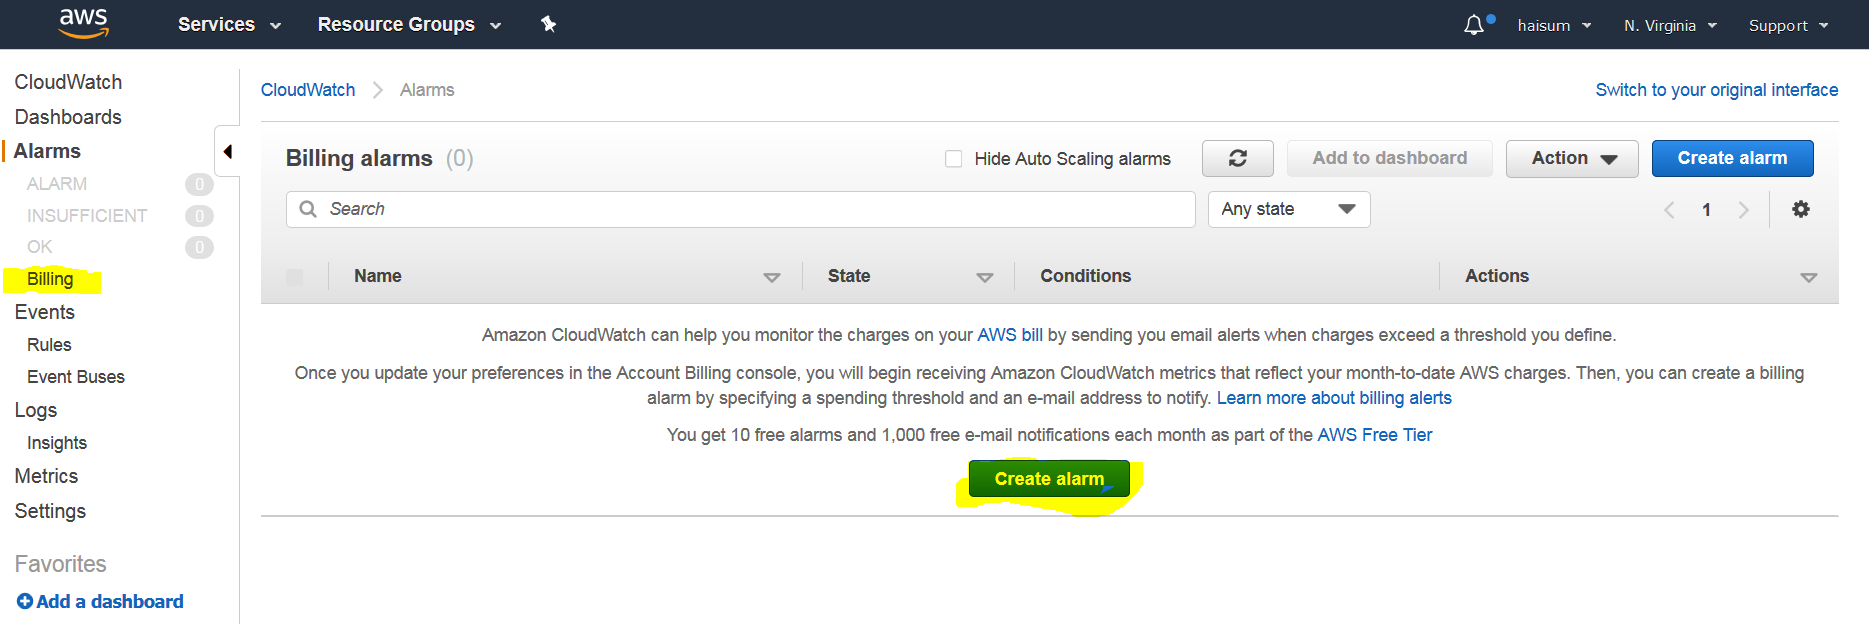
From left menu click Billing then click on create alarm.
Scroll down and select preferred options then put amount. I put 10$ for me.

Next, create new topic and put your email address in new topic. You will need to click on a link in your email to subscribe to these notifications.

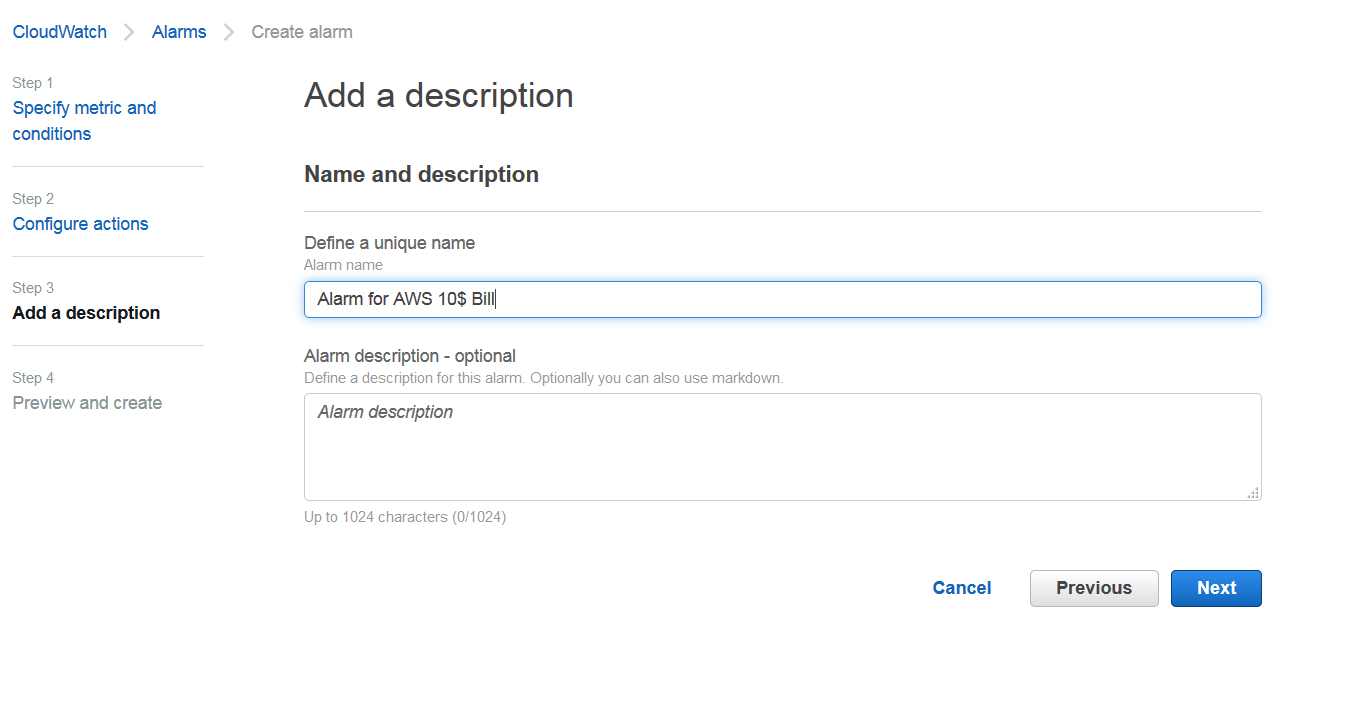
Once topic is created click next and name your alarm.
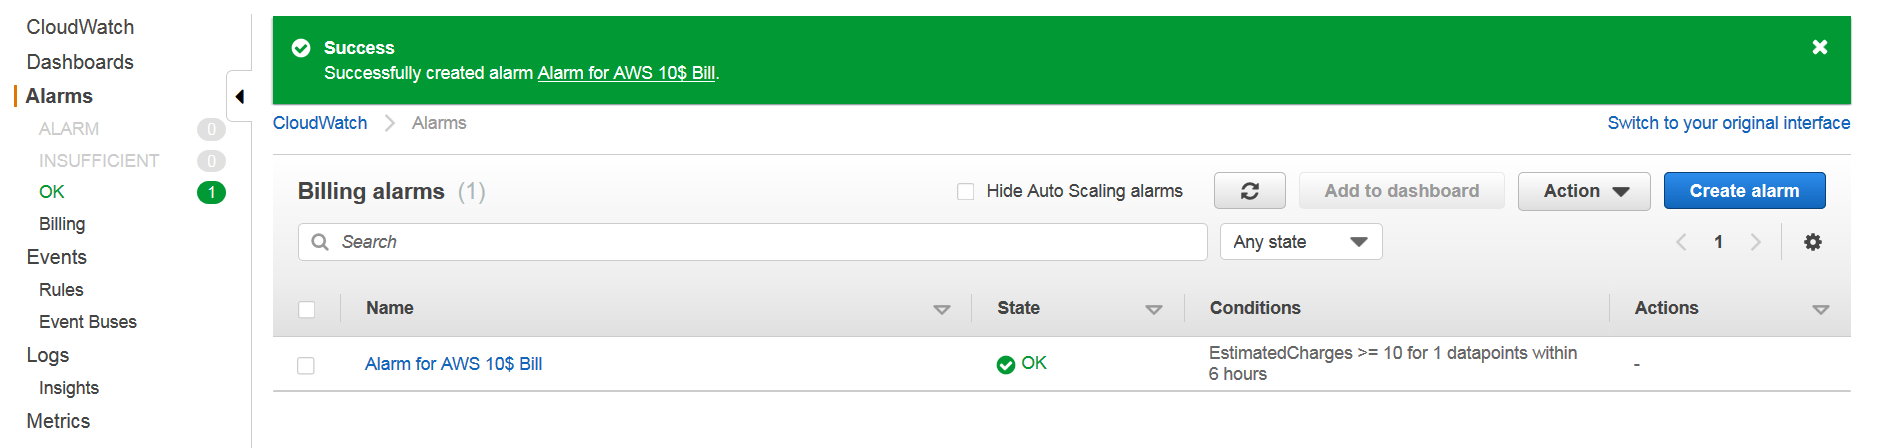
Finally verify all your information, scroll all the way down and click Create alarm.
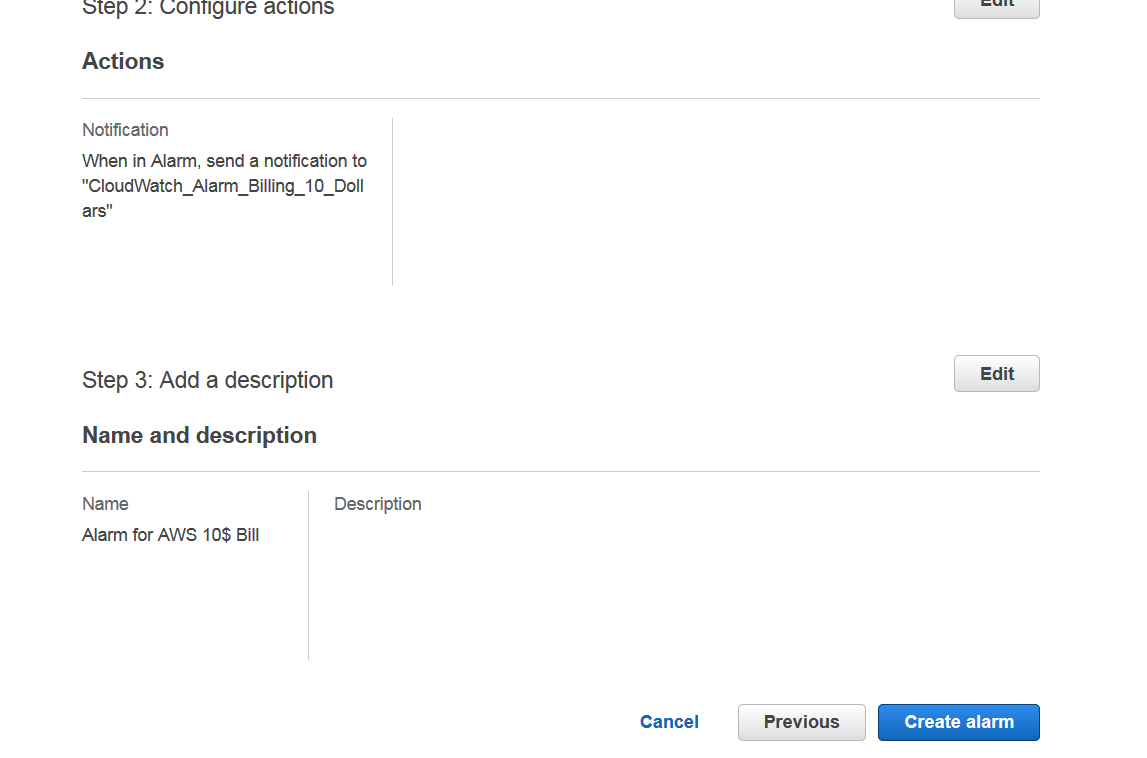
Your alarm should be active now.